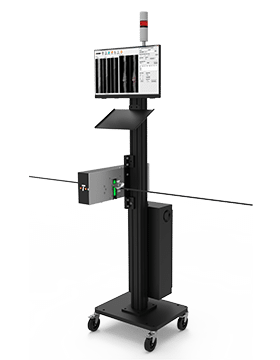
ZT5000
High Speed Diameter Measurement and Lump and Neckdown Gauge
The High-Speed Diameter Measurement and Lump and Neck-Down Inspector is the only tool that can provide images of your lumps and neck-downs on: Bare Wire and Fiber. This is critical in assessing whether a measured diameter variation is in fact a defect and whether action must be taken. Your technical staff won’t have to rewind miles of product to try to locate a defect. They can use Taymer’s image viewing software to analyze and diagnose any detected defects.
Contact us for more information
Accurate, Multi Axis Measurement
This high speed diameter measurement tool provides you with very accurate, multi-axis measurements. This diameter information can be integrated with other machinery in your line for complete automation of your line processes. This high-speed lump and neck-down inspector’s display also makes it easy for engineering and production supervisors to examine the outer surface of your product as it is being extruded.
Quality Assurance
The high speed lump and neck down detector will capture images of your cable defects, save them to disk so you can print them out to include in your quality reporting both internally and to your customers. Defect locations are recorded together with the image of the defect allowing your operators to find and eliminate lumps and neck downs before they reach your customers or fail in the field. With Taymer’s high speed diameter measurement solution, you can be sure the product going to your customers meets your high standards.
Features
- Detects, bulges, neck-downs, lumps, on bare wires, fiber, and other small diameter products.
- Diameter variations as small as 1µm can be identified
- Saves length information for each defect to allow operators to easily locate the defects after detection
- Available in either 1 or 2 axis configurations
- Supports line speeds up to 3000 meters per minute | 9842.52 feet per minute
- System analyzes diameter for the full product length
- Alerts operator and production machinery if a defect is detected
- Utilizes intense LED backlighting to create sharply defined wire edges
- Generates a PDF report that contains diameter and defect information for the whole run
Specifications
- Maximum Line speed:
3,000 m/min | 9,800 ft/min – Exact max speed will depend on specific application - Detectable Diameter Variation (+/-):
1µm (Exact dimension depends on application and camera configuration) - Defect Length Along the Cable:
At 3000 meters per minute, the minimum defect length that can be detected is 0.3 mm. Smaller defect lengths can be detected at lower speeds - Number of Measurement Axes:
1, 2 or 3 axis configurations are available - Pixels per square mm
~300 for most applications - Weight:
10 kg | 22 lbs
- Dimensions (without stand):
- 500 mm x 125 mm x 125 mm – L x W x H
- 20” x 5” x 5” – L x W x H
- Custom stands can be built
- Lighting:
LED - Location:
Can be positioned anywhere in-line. Typically located on wire drawing line, draw tower or rewinding line - Image Processing:
All images from all cameras are read, enhanced and analyzed, resulting in 100% product coverage at the maximum line speed - Types of Defect Detected:
Neck-downs, Bulges/Lumps, Diameter changes - Power Supply:
110V or 230V, 50/60Hz

